In LTI 1.1, the platform (formerly called the Tool Consumer) creates a form post request with all the LTI parameters as name/value pairs, calculates a signature using OAuth 1.0a rules, and POSTs the request to the tool (formerly called the Tool Provider). The tool then re-calculates the signature, and if it matched the signature in the form post, the tool would render itself appropriately.
In LTI 1.3, the flow follows OpenID Connect and OAuth 2.0 conventions.
- The platform initiates a third party login by sending a request to the tool’s login URL with four pieces of information:
- The platform issuer URL
- The user’s login ID
- The tool’s launch URL
- The resource link ID
- The tool verifies that the platform issuer is valid and sends an Authorization Request back to the platform requesting an id_token be POSTed to the resource link URL.
- The platform then creates a JWT with all the LTI parameters as claims, signs the JWT using the platform private key, and sends the signed token as a form post to the resource link URL.
- The tool requests the platform’s public key, verifies the signed JWT’s validity, and renders itself appropriately.
Let’s see how that’s implemented. All of the source code can be found in GitHub:
- LtiAdvantagePlatform – Sample LTI Advantage Platform using ASP.NET Core.
- /Pages/OidcLaunch – Sends the third party login request to the tool
- LtiAdvantageTool – Sample LTI Advantage Tool using ASP.NET Core.
- /Pages/OidcLogin – Receives the third party login request from a platform and sends the authentication request to the platform
- /Pages/Tool – Receives the id_token from a platform
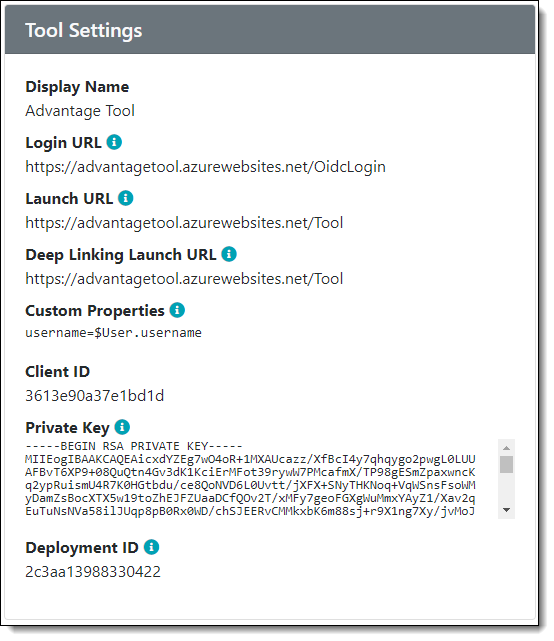
Register the Tool with the Platform
To complete all the steps in the launch flow, the platform needs to know the tool’s login URL, launch URL, client ID, and either the tool’s private key or public key.
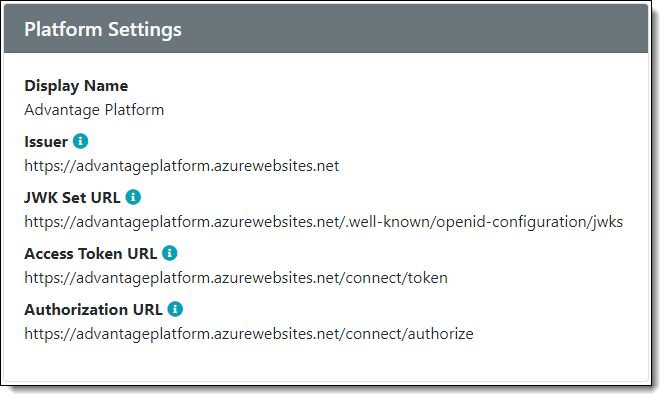
Register the Platform with the Tool
Similarly, the tool needs to know the platform’s issuer URL, JSON Web Key Set URL, and authorization URL (the Access Token URL will be needed later).
1. Platform Initiates Third Party Login
When a user (e.g. a student) click’s on a resource link (e.g. an assignment), the platform initiates a third party login.
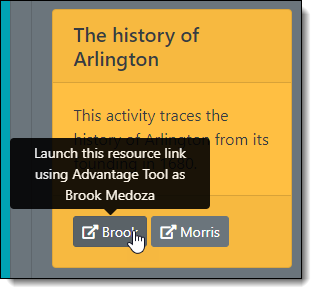
The resource link URL in the image above is /OidcLaunch?id=4&messageType=LtiResourceLinkRequest&courseId=1&personId=2. Where the OidcLaunch page initiates the third party login.
First the page parses the request using model binding:
        /// <summary>
        /// Initiate login to tool from platform.
        /// </summary>
        /// <param name="id">The resource link or tool id.</param>
        /// <param name="messageType">The lti message type.</param>
        /// <param name="courseId">The course id (or null if not launched from a course).</param>
        /// <param name="personId">The person id to impersonate.</param>
        /// <returns></returns>
        public async Task<IActionResult> OnGetAsync(int id, string messageType, string courseId, string personId)
Then the page looks up the tool settings (the other message type is a DeepLinking message which I’ll write about separately):
            Tool tool;

            if (messageType == Constants.Lti.LtiResourceLinkRequestMessageType)
            {
                var resourceLink = await _context.GetResourceLinkAsync(id);
                if (resourceLink == null)
                {
                    _logger.LogError("Resource link not found.");
                    return BadRequest();
                }

                tool = resourceLink.Tool;
            }
            else
            {
                tool = await _context.GetToolAsync(id);
            }

            if (tool == null)
            {
                _logger.LogError("Tool not found.");
                return BadRequest();
            }
And finally the browser is redirected to the third party login URL on the tool’s web site:
            // Send request to tool's endpoint to initiate login
            var values = new
            {
                // The issuer identifier for the platform
                iss = Request.HttpContext.GetIdentityServerIssuerUri(),
                // The platform identifier for the user to login
                login_hint = personId,
                // The endpoint to be executed at the end of the OIDC authentication flow
                target_link_uri = tool.LaunchUrl,
                // The identifier of the LtiResourceLink message (or the deep link message, etc)
                lti_message_hint = JsonConvert.SerializeObject(new {id, messageType, courseId })
            };

            var url = new RequestUrl(tool.LoginUrl).Create(values);
            return Redirect(url);
2. Tool Validates Login and Requests Authorization
First the tool parses the login request:
        /// <summary>
        /// Platform Issuer URL
        /// </summary>
        [BindProperty(Name = "iss", SupportsGet = true)]
        public string Issuer { get; set; }

        /// <summary>
        /// Opaque value that helps the platform identify the user
        /// </summary>
        [BindProperty(Name = "login_hint", SupportsGet = true)]
        public string LoginHint { get; set; }

        /// <summary>
        /// Opaque value that helps the platform identity the resource link
        /// </summary>
        [BindProperty(Name = "lti_message_hint", SupportsGet = true)]
        public string LtiMessageHint { get; set; }

        /// <summary>
        /// Tool's launch URL
        /// </summary>
        [BindProperty(Name = "target_link_uri", SupportsGet = true)]
        public string TargetLinkUri { get; set; }
Then verifies that it recognizes the issuer:
            // Get the platform settings
            var platform = await _context.GetPlatformByIssuerAsync(Issuer);
            if (platform == null)
            {
                _logger.LogError($"Issuer not found [{Issuer}].");
                return BadRequest();
            }
And that target_link_uri is valid:
            // RPs MUST verify the value of the target_link_uri to prevent being
            // used as an open redirector to external sites.
            if (!Uri.TryCreate(TargetLinkUri, UriKind.Absolute, out var targetLinkUri))
            {
                _logger.LogError($"Invalid target_link_uri [{TargetLinkUri}].");
                return BadRequest();
            }

            if (targetLinkUri.Host != Request.Host.Host)
            {
                _logger.LogError($"Invalid target_link_uri [{TargetLinkUri}].");
                return BadRequest();
            }
If it all checks out, the browser is redirected to the platform’s Authorization URL:
            var ru = new RequestUrl(platform.AuthorizeUrl);
            var url = ru.CreateAuthorizeUrl
            (
                clientId: platform.ClientId,
                responseType: OidcConstants.ResponseTypes.IdToken,

                // POST the id_token directly to the tool's launch URL
                redirectUri: TargetLinkUri,
                responseMode: OidcConstants.ResponseModes.FormPost,

                // Per IMS guidance
                scope: OidcConstants.StandardScopes.OpenId,

                // Consider checking state after redirect to make sure the state was not tampared with
                state: CryptoRandom.CreateUniqueId(),

                // The userId
                loginHint: LoginHint,

                // Consider checking nonce at launch to make sure the id_token came from this flow and not direct
                nonce: CryptoRandom.CreateUniqueId(),

                // No user interaction
                prompt: "none",

                // The messagedId (i.e. resource link id or deep link id)
                extra: new { lti_message_hint = LtiMessageHint }
            );

            _logger.LogInformation("Requesting authentication.");

            return Redirect(url);
3. Platform Creates an id_token
My sample platform relies on Identity Server to validate the authentication request. Then it determines what kind of id_token is required: one for an LTI resource link request, or one for an LTI deep linking request:
                _logger.LogDebug("Getting LTI Advantage claims for identity token for subject: {subject} and client: {clientId}",
                    context.Subject.GetSubjectId(),
                    request.Client.ClientId);

                // LTI Advantage authorization requests include an lti_message_hint parameter
                var ltiMessageHint = request.Raw["lti_message_hint"];
                if (ltiMessageHint.IsMissing())
                {
                    _logger.LogInformation("Not an LTI request.");
                    return;
                }

                // LTI Advantage authorization requests include the the user id in the LoginHint
                // (also available in the Subject). In this sample platform, the user id is for one
                // of the tenants' people.
                if (!int.TryParse(request.LoginHint, out var personId))
                {
                    _logger.LogError("Cannot convert login hint to person id.");
                }

                // In this sample platform, the lti_message_hint is a JSON object that includes the
                // message type (LtiResourceLinkRequest or DeepLinkingRequest), the tenant's course
                // id, and either the resource link id or the tool id depending on the type of message.
                // For example, "{"id":3,"messageType":"LtiResourceLinkRequest","courseId":"1"}"
                var message = JToken.Parse(ltiMessageHint);
                var id = message.Value<int>("id");
                // In this sample platform, each application user is a tenant.
                var user = await _context.GetUserLightAsync(_httpContextAccessor.HttpContext.User);
                var course = message.Value<int?>("courseId").HasValue ? user.Course : null;
                var person = await _context.GetPersonAsync(personId);

                var messageType = message.Value<string>("messageType");

                switch (messageType)
                {
                    case Constants.Lti.LtiResourceLinkRequestMessageType:
                    {
                        var resourceLink = await _context.GetResourceLinkAsync(id);

                        // Null unless there is exactly one gradebook column for the resource link.
                        var gradebookColumn = await _context.GetGradebookColumnByResourceLinkIdAsync(id);

                        context.IssuedClaims = GetResourceLinkRequestClaims(
                            resourceLink, gradebookColumn, person, course, user.Platform);

                        break;
                    }
                    case Constants.Lti.LtiDeepLinkingRequestMessageType:
                    {
                        var tool = await _context.GetToolAsync(id);

                        context.IssuedClaims = GetDeepLinkingRequestClaims(
                            tool, person, course, user.Platform);

                        break;
                    }
                    default:
                        _logger.LogError($"{nameof(messageType)}=\"{messageType}\" not supported.");

                        break;
                }
If the id_token is for an LTI resource link message, then the appropriate claims are added to the JWT:
        /// <summary>
        /// Returns the LTI claims for an LtiResourceLinkRequest.
        /// </summary>
        /// <param name="resourceLink">The resource link.</param>
        /// <param name="gradebookColumn">The gradebool column for this resource link.</param>
        /// <param name="person">The person being authorized.</param>
        /// <param name="course">The course (can be null).</param>
        /// <param name="platform">The platform.</param>
        /// <returns></returns>
        private List<Claim> GetResourceLinkRequestClaims(
            ResourceLink resourceLink,
            GradebookColumn gradebookColumn,
            Person person,
            Course course,
            Platform platform)
        {
            var httpRequest = _httpContextAccessor.HttpContext.Request;

            var request = new LtiResourceLinkRequest
            {
                DeploymentId = resourceLink.Tool.DeploymentId,
                FamilyName = person.LastName,
                GivenName = person.FirstName,
                LaunchPresentation = new LaunchPresentationClaimValueType
                {
                    DocumentTarget = DocumentTarget.Window,
                    Locale = CultureInfo.CurrentUICulture.Name,
                    ReturnUrl = $"{httpRequest.Scheme}://{httpRequest.Host}"
                },
                Lis = new LisClaimValueType
                {
                    PersonSourcedId = person.SisId,
                    CourseSectionSourcedId = course?.SisId
                },
                Lti11LegacyUserId = person.Id.ToString(),
                Platform = new PlatformClaimValueType
                {
                    ContactEmail = platform.ContactEmail,
                    Description = platform.Description,
                    Guid = platform.Id.ToString(),
                    Name = platform.Name,
                    ProductFamilyCode = platform.ProductFamilyCode,
                    Url = platform.Url,
                    Version = platform.Version
                },
                ResourceLink = new ResourceLinkClaimValueType
                {
                    Id = resourceLink.Id.ToString(),
                    Title = resourceLink.Title,
                    Description = resourceLink.Description
                },
                Roles = PeopleModel.ParsePersonRoles(person.Roles),
                TargetLinkUri = resourceLink.Tool.LaunchUrl
            };

            // Add the context if the launch is from a course.
            if (course == null)
            {
                // Remove context roles
                request.Roles = request.Roles.Where(r => !r.ToString().StartsWith("Context")).ToArray();
            }
            else
            {
                request.Context = new ContextClaimValueType
                {
                    Id = course.Id.ToString(),
                    Title = course.Name,
                    Type = new[] { ContextType.CourseSection }
                };

                request.AssignmentGradeServices = new AssignmentGradeServicesClaimValueType
                {
                    Scope = new List<string>
                    {
                        Constants.LtiScopes.AgsLineItem
                    },
                    LineItemUrl = gradebookColumn == null ? null : _linkGenerator.GetUriByRouteValues(Constants.ServiceEndpoints.AgsLineItemService,
                        new { contextId = course.Id, lineItemId = gradebookColumn.Id }, httpRequest.Scheme, httpRequest.Host),
                    LineItemsUrl = _linkGenerator.GetUriByRouteValues(Constants.ServiceEndpoints.AgsLineItemsService,
                        new { contextId = course.Id }, httpRequest.Scheme, httpRequest.Host)
                };

                request.NamesRoleService = new NamesRoleServiceClaimValueType
                {
                    ContextMembershipUrl = _linkGenerator.GetUriByRouteValues(Constants.ServiceEndpoints.NrpsMembershipService,
                        new { contextId = course.Id }, httpRequest.Scheme, httpRequest.Host)
                };
            }

            // Collect custom properties
            if (!resourceLink.Tool.CustomProperties.TryConvertToDictionary(out var custom))
            {
                custom = new Dictionary<string, string>();
            }
            if (resourceLink.CustomProperties.TryConvertToDictionary(out var linkDictionary))
            {
                foreach (var property in linkDictionary)
                {
                    if (custom.ContainsKey(property.Key))
                    {
                        custom[property.Key] = property.Value;
                    }
                    else
                    {
                        custom.Add(property.Key, property.Value);
                    }
                }
            }

            // Prepare for custom property substitutions
            var substitutions = new CustomPropertySubstitutions
            {
                LtiUser = new LtiUser
                {
                    Username = person.Username
                }
            };

            request.Custom = substitutions.ReplaceCustomPropertyValues(custom);

            return new List<Claim>(request.Claims);
        }
Identity Server then signs the JWT with the platform’s private key and the browser POSTs the id_token to the tool’s launch URL.
4. The Tool Verifies JWT and Renders Itself
First the tool verifies that there IS an id_token and that is in the correct format:
            if (string.IsNullOrEmpty(IdToken))
            {
                Error = "id_token is missing or empty";
                return Page();
            }

            var handler = new JwtSecurityTokenHandler();
            if (!handler.CanReadToken(IdToken))
            {
                Error = "Cannot read id_token";
                return Page();
            }

            Token = handler.ReadJwtToken(IdToken);
Then the tool makes sure the JWT has required claims:
            var messageType = Token.Claims.SingleOrDefault(c => c.Type == Constants.LtiClaims.MessageType)?.Value;
            if (messageType.IsMissing())
            {
                Error = $"{Constants.LtiClaims.MessageType} claim is missing.";
                return Page();
            }

            // The ID Token MUST contain a nonce Claim.
            var nonce = Token.Claims.SingleOrDefault(c => c.Type == "nonce")?.Value;
            if (string.IsNullOrEmpty(nonce))
            {
                Error = "Nonce is missing.";
                return Page();
            }
And that the platform issuer is registered:
            // The Audience must match a Client ID exactly.
            var platform = await _context.GetPlatformByIssuerAndAudienceAsync(Token.Payload.Iss, Token.Payload.Aud);
            if (platform == null)
            {
                Error = "Unknown issuer/audience.";
                return Page();
            }
Then the tool uses the platform’s JWKS URL to get the platform’s public key:
            RSAParameters rsaParameters;

            try
            {
                var httpClient = _httpClientFactory.CreateClient();
                var keySetJson = await httpClient.GetStringAsync(platform.JwkSetUrl);
                var keySet = JsonConvert.DeserializeObject<JsonWebKeySet>(keySetJson);
                var key = keySet.Keys.SingleOrDefault(k => k.Kid == Token.Header.Kid);
                if (key == null)
                {
                    Error = "No matching key found.";
                    return Page();
                }

                rsaParameters = new RSAParameters
                {
                    Modulus = Base64UrlEncoder.DecodeBytes(key.N),
                    Exponent = Base64UrlEncoder.DecodeBytes(key.E)
                };
            }
            catch (Exception e)
            {
                Error = e.Message;
                return Page();
            }
Then using the public key, the tool validates the id_token:
            var validationParameters = new TokenValidationParameters
            {
                ValidateTokenReplay = true,
                ValidateAudience = false, // Validated above
                ValidateIssuer = false, // Validated above
                RequireSignedTokens = true,
                ValidateIssuerSigningKey = true,
                IssuerSigningKey = new RsaSecurityKey(rsaParameters),

                ValidateLifetime = true,
                ClockSkew = TimeSpan.FromMinutes(5.0)
            };

            try
            {
                handler.ValidateToken(IdToken, validationParameters, out _);
            }
            catch (Exception e)
            {
                Error = e.Message;
                return Page();
            }
If all the tests pass, then the tool renders itself in the browser.
All of the source code can be found in GitHub:
- LtiAdvantagePlatform – Sample LTI Advantage Platform using ASP.NET Core.
- /Pages/OidcLaunch – Sends the third party login request to the tool
- LtiAdvantageTool – Sample LTI Advantage Tool using ASP.NET Core.
- /Pages/OidcLogin – Receives the third party login request from a platform and sends the authentication request to the platform
- /Pages/Tool – Receives the id_token from a platform
- LtiAdvantage – ASP.NET Core library for both platforms and tools.